Home Theater Seating Layout: Planning Rows, Spacing and Viewing Angles
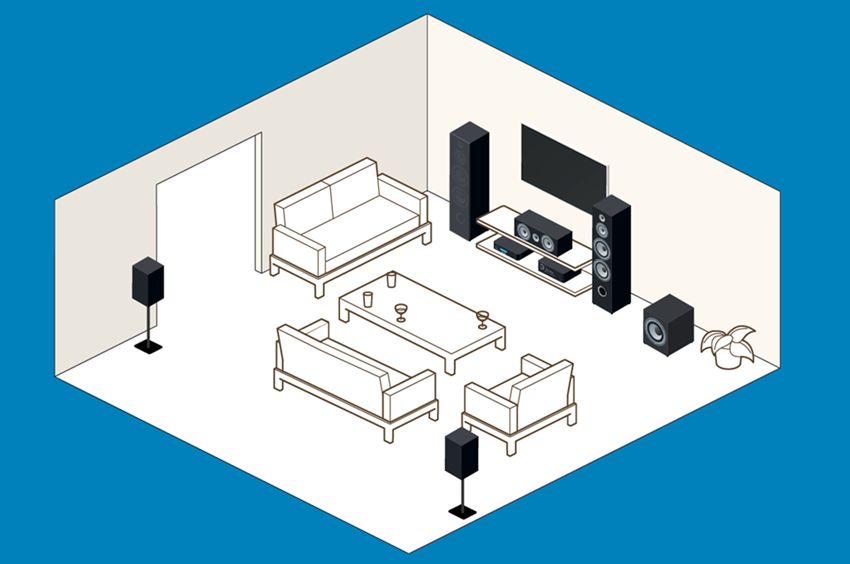
A good home theater seating layout provides a clear view, comfortable movement, and balanced sound.
The seats should be planned before the final screen and speaker positions are fixed.
Room dimensions alone do not determine how many seats will fit. Reclining depth, walkways, door clearance, speaker locations, and viewing angles also affect the layout.
This guide explains how to arrange one or more seating rows. It also covers viewing distance, seat spacing, risers, accessibility, and common planning mistakes.
Start with the Room
Measure the room before choosing chairs or a sofa. Record the usable width, length, and ceiling height.
Your drawing should also show:
- Doors and their opening direction
- Windows and curtains
- Radiators and ventilation openings
- Columns, steps, and sloped walls
- Electrical outlets
- Screen or television location
- Projector location, when applicable
- Existing speaker positions
Do not treat the entire floor area as usable seating space. Doors need clearance. Equipment also needs ventilation and service access.
Use painter’s tape to mark the proposed furniture on the floor. This simple test reveals crowding before you order anything.
For help planning the complete room, see our
home theater design guide.
Choose the Viewing Distance
There is no perfect viewing distance for every screen. Screen size, resolution, content, and personal preference all matter.
Avoid relying on one universal multiplier. A distance that feels immersive to one viewer may feel uncomfortable to another.
Start with guidance from the display manufacturer. Then test the proposed position with similar content.
Check the Entire Screen
Sit at the planned distance and look at each screen corner. You should see the image without repeated head movement.
Subtitles should also remain easy to read. Moving too far away can make small details difficult to see.
Consider the Screen Type
A television and a projector may create different viewing experiences. Image brightness and visible detail can also affect comfort.
Projector placement introduces another limitation. Seats must not block the light path. Tall viewers should not cast shadows on the screen.
Test Before Final Installation
Place a temporary chair at the proposed location. Watch varied material for more than a few minutes.
Test bright scenes, dark scenes, subtitles, sports, and games. This provides better guidance than a formula alone.
Identify the Main Seating Position
The main seating position is the most important place in the room. It is often called the primary listening position.
Place it near the screen’s horizontal centerline when practical. This usually provides a balanced view and a useful reference for speaker calibration.
Avoid placing the main seat directly against the rear wall. That position can make surround placement difficult. Bass may also sound uneven near room boundaries.
The geometric center of the room is not always ideal either. Room dimensions can create uneven bass at certain locations.
Test several positions when possible. Small changes can improve both sound and picture comfort.
Measure Home Theater Seats Correctly
Furniture dimensions often show only the seat in its upright position. This is not enough for layout planning.
Record these measurements for every candidate:
- Overall width
- Upright depth
- Fully reclined depth
- Backrest height
- Seat height
- Required wall clearance
- Footrest extension
- Power-cord location
Measure a complete row rather than multiplying one chair’s width. Shared armrests can change the total measurement.
Curved rows also require more depth than straight rows. Ask the seller for the full configuration dimensions.
Our separate guide to
home theater chairs and recliners
explains materials, dimensions, support, and optional features.
Plan Seat and Row Spacing
Spacing must be based on the seats in their largest usable position. For recliners, this means measuring them fully extended.
Leave enough room for someone to pass without striking a footrest. Also allow space for cleaning and maintenance.
Before confirming the layout, check:
- Clearance behind each backrest
- Space in front of each footrest
- Room for people to enter and leave
- Access to cup holders and controls
- Clearance around side tables
- Space for power cables
Do not use a generic spacing number without checking the furniture. Reclining mechanisms differ greatly between models.
Straight Versus Curved Rows
A straight row uses space efficiently. It is often easier to position in a narrow room.
A curved row can turn the outer seats toward the screen. However, it usually needs more width and depth.
Compare the manufacturer’s drawings for each configuration. Confirm the dimensions before ordering.
Allow Space for Aisles
Every seat should have a practical route to the door. People should not need to climb over furniture or equipment.
A side aisle often works better than a narrow path through the middle. It can preserve the screen’s central viewing positions.
A center aisle may be useful in a wide room. However, it can remove the most desirable central seat.
Keep these areas clear:
- Doorways
- Steps
- Electrical panels
- Equipment cabinets
- Ventilation openings
- Emergency exit routes
Required aisle widths and guardrails vary by location. Consult local building rules for permanent construction.
Choose the Number of Seating Rows
One Row
One row is often the best choice for a small room. It simplifies viewing, speaker placement, and access.
A sofa may suit a multipurpose room. Individual recliners provide more personal adjustment.
Two Rows
Two rows can increase capacity without making one row excessively wide. The rear row may require elevation.
Check the view from every rear seat. The front row should not block subtitles or the lower screen area.
Three or More Rows
Several rows require careful planning. Ceiling height and sightlines become especially important.
Large layouts also need suitable aisles, steps, lighting, ventilation, and speaker coverage. Professional design may be worthwhile for permanent construction.
Plan a Home Theater Riser
A riser elevates a rear seating row. Its purpose is to provide a clear view over the people in front.
There is no universal riser height. The correct height depends on:
- Screen height
- Distance between rows
- Seat height
- Backrest height
- Viewer eye level
- Ceiling height
Create a side-view drawing before construction. Draw a line from the rear viewer’s eyes to the screen’s lower edge.
The line should pass above the viewer in front. Allow extra margin for people of different heights.
Check Headroom
Raising a row reduces the available headroom. This matters near soffits, beams, projectors, and sloped ceilings.
Check both seated and standing clearance. Include the height of the finished floor and carpet.
Riser Safety
A permanent riser should feel stable and level. Steps should be easy to see in a dark room.
Local rules may apply to step dimensions, handrails, wiring, and construction. Consult a qualified professional when needed.
Do not run unprotected extension cords across the riser. Plan approved electrical outlets before closing the structure.
Coordinate Seating with Speaker Placement
Seating and speaker positions should be designed together. Moving the chairs later can change the intended listening angles.
Use the main seating position as the reference point. Speaker guides often show angles measured from this location.
Avoid blocking speakers with tall chair backs. This is especially important for surround channels near seated ear level.
Center Speaker
The center speaker should direct sound toward the audience. A very low speaker may need to angle upward.
Make sure the front row does not block it. This can affect dialogue clarity in the rear row.
Surround Speakers
Do not place a listener directly against a surround speaker. Very short distances can make one channel sound dominant.
Several rows may need wider speaker coverage. Follow the speaker manufacturer’s guidance and the chosen surround format.
Subwoofers
Bass response can vary between seats. A location that sounds balanced in one chair may sound weak in another.
Test subwoofer placement before fixing the seating. Room calibration can help, but it cannot solve every placement problem.
Choose a Suitable Seating Type
The furniture should match the room’s purpose. A dedicated cinema and a family living room have different needs.
Individual Recliners
Recliners provide separate armrests and adjustable positions. They work well in organized theater-style rows.
They also require enough space for their mechanisms. Check the fully open dimensions.
Loveseats
A loveseat can fit two people in less space than separate wide recliners. Some designs remove the center armrest.
Sofas and Sectionals
A sofa creates a casual family layout. A sectional can offer flexible lounging positions.
Large sectionals may place some viewers far from the screen’s centerline. They can also complicate surround placement.
Modular Seating
Modular units can form straight or curved rows. Some systems allow sections to be added later.
Confirm that replacement modules will remain compatible. Product dimensions can change between collections.
Home Theater Seating Ideas for Different Rooms
Small Room
Use one compact row. A loveseat or narrow recliners may preserve a useful side aisle.
Avoid filling every available inch with furniture. Fewer comfortable seats often work better than a crowded layout.
Medium Room
Consider one wide row or two shorter rows. Compare both arrangements before adding a riser.
A sofa in front and compact seats behind can support family use. However, each row must retain a clear view.
Large Dedicated Theater
A larger room can support multiple rows and one or two aisles. It may also need several lighting zones.
Do not assume that every row will receive equal sound. Test coverage and calibrate the system after installation.
Multipurpose Media Room
A sofa or modular sectional often suits everyday use. Movable chairs can provide extra seating when needed.
Keep temporary chairs away from speaker paths and projector light. Mark useful positions if the furniture moves frequently.
Lighting and Electrical Planning
Home theater seating often needs nearby power. Motorized recliners, USB ports, and accessories may require several connections.
Plan outlets before installing a riser or fixed row. Keep cables away from aisles and moving mechanisms.
Low-level step lighting can make a dark room safer. It should remain dim enough to avoid distracting reflections on the screen.
Place switches where they can be reached when entering and leaving. Separate lighting zones provide more flexibility.
Avoid placing bright indicator lights directly below the screen. Covering necessary indicators may improve dark-room viewing.
Comfort and Accessibility
Comfort involves more than soft padding. Seat depth and support should suit the people using the room.
Test a chair in both upright and reclined positions. Your head should remain supported without being pushed too far forward.
Consider these practical details:
- Seat height
- Back and neck support
- Ease of standing up
- Control placement
- Surface temperature
- Cleaning requirements
- Access from the room entrance
Leave an unobstructed route for anyone with limited mobility. A removable armrest or open seating position may also improve access.
Accessibility requirements vary by household and location. Seek professional advice for specific mobility needs.
Common Home Theater Seating Mistakes
Buying Seats Before Measuring
Product photos do not show their true scale. Always compare complete dimensions with the room plan.
Measuring Recliners Only When Closed
A row may fit while upright but block the aisle when opened. Use the fully reclined depth.
Adding Too Many Seats
More seats do not always create a better theater. Crowding reduces comfort and makes access difficult.
Placing Every Seat Against a Wall
Wall placement can limit recline and speaker clearance. It may also produce uneven bass.
Ignoring Sightlines
A riser does not guarantee a clear view. Calculate sightlines using actual seat and screen dimensions.
Blocking Speakers
Tall backs can interfere with sound reaching listeners. Check speaker height before ordering furniture.
Forgetting Power and Cables
Powered seats need safe electrical connections. Plan outlets before the furniture arrives.
Using Fixed Price Ranges
Prices change by material, mechanism, shipping, and region. Compare complete delivered costs instead of old price categories.
Home Theater Seating Layout Checklist
- Measure the room and delivery route.
- Mark doors, windows, vents, and equipment.
- Choose the primary viewing position.
- Test the proposed viewing distance.
- Measure seats upright and fully reclined.
- Confirm the total width of each row.
- Leave practical aisles and exit routes.
- Calculate rear-row sightlines.
- Check ceiling height above any riser.
- Coordinate seats with speaker positions.
- Plan outlets for powered furniture.
- Check local requirements for permanent construction.
- Test the layout before placing the final order.
After installing the furniture, follow our
home theater setup guide
to connect and calibrate the rest of the system.
Frequently Asked Questions
How far should home theater seating be from the screen?
The best distance depends on screen size, resolution, and personal comfort. Begin with the display manufacturer’s guidance. Test the position before completing the installation.
How much space should be left between theater rows?
There is no universal measurement. Use the seat’s fully reclined depth. Then add enough space for safe movement and cleaning.
Should home theater seating be centered?
The main seat should be near the screen’s centerline when possible. Other seats can extend to either side. Avoid extreme viewing angles.
Does a second row need a riser?
Not always. A riser is needed when the front row blocks the screen. Seat height, screen position, and row spacing determine the result.
How high should a home theater riser be?
Calculate the height from actual sightlines. Do not use one standard height. Remember to check standing headroom and local building requirements.
Are recliners better than a sofa?
Recliners provide individual adjustment and organized rows. A sofa offers flexible family seating. The better option depends on space and room use.
Can theater seats be placed against a wall?
Some wall-hugging recliners need limited rear clearance. Other models require much more space. Follow the manufacturer’s measurements.
Should seats be installed before speaker calibration?
Yes. Furniture affects the listening environment. Place the seats first, then run the receiver’s calibration process.
Final Thoughts
A successful home theater seating layout begins with accurate measurements. It must also account for sightlines, movement, speakers, and recliner clearance.
Plan the primary seat first. Add other positions only when they preserve safe access and a comfortable view.
Test the layout with temporary furniture or floor markings. This can prevent costly changes after the seats or riser arrive.