Hanging Art and Pictures: Placement and Layout Guide
Hanging art and pictures successfully requires the right proportions, spacing, hardware, and relationship with nearby furniture.
Artwork should feel connected to the room rather than floating too high or appearing too small for the available wall.
There is no single placement rule that works in every home.
Ceiling height, furniture, viewing position, frame size, wall construction, and artwork weight all influence the final arrangement.
Planning the layout before making holes produces a safer and more balanced result.

Choose Artwork for the Room
Choose artwork that you enjoy and that relates to the room in a meaningful way.
It does not have to match every color in the furniture, curtains, or rug.
A piece can connect with the interior through:
- Color
- Subject
- Frame material
- Scale
- Shape
- Period or design style
- Personal meaning
Consider how the room is used.
A quiet landscape may suit a bedroom, while a bold abstract work may become a focal point in a living or dining area.
Valuable, fragile, or irreplaceable artwork needs additional care.
Its environmental and framing requirements should take priority over finding the most visually dramatic wall.
For bedroom-specific guidance, see our article about
choosing artwork for a bedroom.
Measure the Wall and Furniture
Measure the available wall before deciding that a frame is too large or too small.
Include the furniture, doors, windows, switches, lamps, and architectural features below or beside it.
Record:
- The width and height of the open wall area
- The width of the sofa, bed, console, or dresser
- The distance from furniture to the ceiling
- The locations of switches and outlets
- The size of every frame
- The position of each hanging point
Artwork above furniture should usually feel visually connected to the furniture.
A very small frame above a long sofa may appear isolated.
A wide piece that extends beyond the furniture may make the arrangement feel unstable.
Before purchasing large artwork, mark its proposed dimensions on the wall with removable low-tack tape.
Test the tape in an inconspicuous location first.
How High Should You Hang Artwork?
Artwork is often hung too high.
In an open area, a useful starting point is to position the center of the picture near the average standing eye level.
A commonly used reference is approximately 57 to 60 inches, or 145 to 152 centimeters, from the floor to the artwork’s center.
This is a starting point rather than a requirement.
Adjust it for:
- Very low or high ceilings
- The height of household members
- Seated viewing positions
- Nearby furniture
- Architectural details
- The scale of the artwork
Treat a group of pictures as one large composition.
Find the center of the complete arrangement rather than placing the center of every frame at the same height.
Step back and view the proposed position from the main entrance and normal seating area.
A technically measured position can still look wrong in the room.
Hang Art Above Furniture
Artwork above a sofa, bed, console, or dresser should form a visual unit with the furniture.
The gap should be close enough to create a relationship without making the frame feel crowded.
A distance of roughly 6 to 10 inches, or 15 to 25 centimeters, above the furniture can provide a useful starting point.
Adjust it according to the frame, furniture, wall height, and objects placed on the surface.
Check that seated people cannot strike the frame.
This is especially important above sofas, benches, and headboards.
When decorating above a console, account for lamps, vases, plants, and other tall objects.
Artwork can be centered over the complete furniture arrangement rather than the bare table alone.
Our
living room design guide
provides additional ideas for connecting artwork with furniture, lighting, and circulation.
Choose Safe Picture-Hanging Hardware
The mounting method must suit the artwork’s weight, frame construction, wall material, and hanging hardware.
Do not select an anchor based only on its appearance.
Common wall materials include:
- Drywall or plasterboard
- Plaster over lath
- Wood paneling
- Masonry
- Concrete
- Tile
Each material requires suitable tools and fasteners.
An anchor designed for drywall may not be appropriate for plaster, brick, hollow masonry, or tile.
Check the Weight
Weigh the complete framed artwork, including the glass, backing, frame, and attached hanging hardware.
Use fasteners with a stated load capacity that provides a suitable safety margin.
The stated capacity may depend on correct installation and the condition of the wall.
Old, damaged, damp, or weak wall material may not support the advertised load.
Use Wall Studs When Appropriate
A securely identified wooden stud can provide strong support for heavy artwork.
However, stud location and construction differ between buildings.
Use an appropriate detector and consider the possible presence of electrical wiring, plumbing, ducts, and other concealed services.
Do not drill where hidden utilities may be present.
Inspect the Frame Hardware
Check D-rings, wires, screws, brackets, and frame joints before hanging.
Old wire or loose screw eyes may fail even when the wall anchor is strong.
Large or heavy pieces may benefit from two attachment points or an approved cleat system.
This can distribute the load and reduce tilting.
Follow the hardware manufacturer’s installation instructions.
Seek professional help for valuable, oversized, heavy, or unusually shaped artwork.
How to Hang a Single Picture
- Measure the frame’s width and height.
- Identify the intended center point on the wall.
- Measure from the frame top to the tensioned wire or hanging bracket.
- Transfer that measurement to the wall.
- Check for concealed utilities.
- Install suitable hardware.
- Hang the frame and support it until the hardware is engaged.
- Use a level to check the final position.
- Step back and inspect the result from several locations.
Do not measure an unloaded picture wire in its relaxed position.
The wire rises when the frame’s weight pulls against the hook.
Measure it while gently pulling it upward.
Small rubber or felt bumpers on the lower frame corners can help it remain level.
They may also reduce direct contact with the painted wall.
How to Plan a Gallery Wall
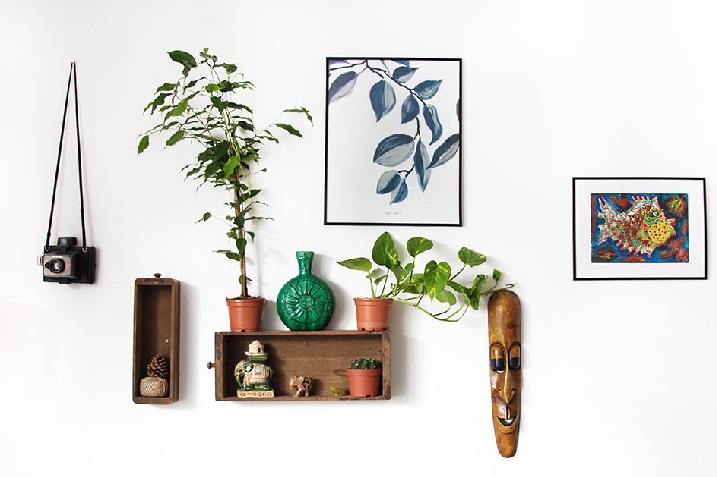
A gallery wall can combine photographs, prints, paintings, textiles, and small decorative objects.
The arrangement should have a visual connection even when the frames do not match.

Start With the Largest Piece
The largest or most visually important piece can act as an anchor.
Place the smaller frames around it while maintaining balanced visual weight.
Arrange Everything Before Drilling
Lay the frames on a clean floor or large table.
Try several layouts and photograph each option for comparison.
Another method is to cut paper templates that match the frame dimensions.
Position the templates on the wall with removable tape.
Mark each template with the location of its hanging point.
Choose a Layout Style
Common gallery-wall layouts include:
- Grid: frames share consistent dimensions and spacing.
- Linear: pictures follow one horizontal or vertical line.
- Salon style: different sizes form a dense but balanced group.
- Central anchor: smaller pieces surround one dominant work.
- Shelf display: frames overlap slightly on a picture ledge.
A grid works well for photographs or related prints.
A looser arrangement can suit an eclectic collection.
Choose Consistent Frame Spacing
Consistent spacing helps separate frames while keeping the arrangement unified.
A gap of approximately 2 to 4 inches, or 5 to 10 centimeters, is a useful starting point for many gallery walls.
Smaller frames may suit tighter gaps.
Large works may need more space.
The correct distance depends on the frame widths and the total scale of the display.
Measure from frame edge to frame edge.
Do not measure only between hanging hooks.
If the frames have strongly different shapes, align selected edges or centers.
Not every side needs to form a perfect line.
Hanging Pictures Along a Stairway
A stairway gallery should follow the visual movement of the stairs.
The arrangement normally looks more connected when its overall center line rises at a similar angle to the handrail or stair stringer.

Do not rely on a fixed waist-height pencil line.
Stair dimensions, wall height, and viewing positions vary.
Use paper templates and examine the composition from both the top and bottom of the stairs.
Keep frames away from areas where shoulders, furniture, or carried objects may strike them.
Make sure artwork does not reduce required stairway clearance.
Use secure fasteners.
Stairway vibration and frequent movement may cause poorly mounted frames to shift.
Mix Frames and Artwork Styles
Frames do not need to match exactly.
A collection can be connected through one or more repeated details.
Possible unifying elements include:
- A limited frame-color palette
- Similar mat widths
- One subject or theme
- Related artwork colors
- Consistent spacing
- Repeated shapes
Black, white, natural wood, and metallic frames can work together when their distribution feels intentional.
Avoid placing every dark or visually heavy frame on one side of the arrangement.
Not every piece needs a conventional frame.
Canvas, textile art, baskets, plates, and sculptural objects can be included if they have safe mounting systems.
A restrained selection of artwork can be especially effective in a
minimalist interior,
where each displayed object receives more visual attention.
Protect Artwork From Light, Heat and Moisture
A visually attractive location may not be safe for sensitive artwork.
Direct sunlight can fade photographs, prints, textiles, and some pigments.
Avoid placing valuable artwork directly above radiators, fireplaces, humidifiers, or other sources of heat and moisture.
Bathrooms, kitchens, basements, and exterior walls may present additional environmental concerns.
The Smithsonian Museum Conservation Institute recommends using sturdy, appropriately sized hanging hardware.
It also advises placing paintings away from heat, unstable humidity, and direct sunlight.
See its
painting-care guidance
for more information.
Photographs and works on paper may need conservation-quality mats, backing, and glazing.
Seek advice from a qualified framer or conservator for valuable or irreplaceable pieces.

Can You Hang Pictures Without Nails?
Adhesive strips and hooks can be useful for some lightweight objects.
Their performance depends on the wall finish, surface preparation, object weight, installation method, and environmental conditions.
Follow the product’s weight limits and preparation instructions.
Do not exceed the rating by combining strips unless the manufacturer specifically permits that method.
Adhesive products may damage paint, wallpaper, plaster, or other finishes during installation or removal.
Test the method in an inconspicuous location when possible.
Do not rely on general-purpose adhesive strips for valuable, heavy, fragile, or overhead objects.
Use an appropriate mechanical attachment or seek professional installation.
Never attach adhesive products directly to the surface of original photographs, drawings, prints, or paintings.
Use suitable framing and conservation materials.
Common Picture-Hanging Mistakes
Hanging Artwork Too High
Artwork should relate to normal viewing height and nearby furniture.
Check the complete composition rather than measuring from the frame’s bottom edge alone.
Choosing Art That Is Too Small
A small picture can look isolated above a wide sofa or bed.
Use a larger work or combine several pieces into one group.
Using the Wrong Anchor
A fastener must match the object weight and wall material.
An incorrectly installed heavy-duty anchor may still fail.
Ignoring Concealed Wiring and Pipes
Do not drill until you have considered what may be inside the wall.
Use appropriate detection methods and professional help when uncertain.
Planning the Layout While Drilling
Arrange the frames or paper templates first.
This reduces unnecessary holes and spacing errors.
Using Uneven Gallery-Wall Gaps
Unintentional spacing changes can make a group feel disorganized.
Measure the gaps between frame edges.
Ignoring Furniture
Artwork should not appear disconnected from the sofa, bed, console, or other object below it.
Judge the complete wall arrangement.
Exposing Valuable Art to Direct Sunlight
Light damage is cumulative and may be irreversible.
Select a protected location and suitable framing.
Using Damaged Frame Hardware
Inspect wires, screws, D-rings, and frame joints.
Replace worn components before hanging the piece.
Picture-Hanging Checklist
- Measure the wall, artwork, and nearby furniture.
- Weigh the complete framed piece.
- Inspect the frame and its hanging hardware.
- Identify the wall material.
- Check for concealed wiring, plumbing, and other services.
- Select hardware rated for the wall and load.
- Test the position with paper templates or removable tape.
- Measure from the artwork’s center and actual hanging point.
- Install the hardware according to its instructions.
- Confirm that the frame is securely engaged.
- Check the position with a level.
- Inspect the arrangement from several viewing locations.
- Keep sensitive artwork away from direct sun, heat, and moisture.
Frequently Asked Questions
How high should pictures be hung?
In an open wall area, placing the picture’s center approximately 57 to 60 inches from the floor is a useful starting point.
Adjust the height for furniture, viewing position, ceiling height, and artwork size.
How far above a sofa should artwork hang?
A starting distance of roughly 6 to 10 inches above the sofa may create a visual connection.
Confirm that seated people cannot touch the frame and adjust the gap for the room’s proportions.
How much space should be left between pictures?
Approximately 2 to 4 inches can work for many gallery walls.
Smaller frames may need tighter spacing, while large works may need more.
Consistency is usually more important than one exact measurement.
Should artwork be centered on the wall or furniture?
Artwork above a sofa, bed, or console is generally centered in relation to the furniture arrangement.
On an open wall, the surrounding architecture may provide the better reference.
Can different frames be used together?
Yes.
Different frames can be connected through color, matting, subject, scale, or consistent spacing.
Distribute darker and heavier-looking frames throughout the arrangement.
What is the safest way to hang a heavy picture?
Use hardware rated for the complete weight and suitable for the wall construction.
A properly identified structural support or approved cleat system may be appropriate.
Professional installation is advisable for heavy or valuable pieces.
How do I arrange pictures on a stairway?
Plan the overall composition so that it rises with the stairs.
Use paper templates and view the arrangement from both directions.
Maintain safe clearance and secure every frame.
Should pictures be hung in direct sunlight?
Sensitive and valuable artwork should not be placed in direct sunlight.
Prolonged light exposure can cause fading and other irreversible changes.
Final Thoughts
Hanging art and pictures becomes easier when the complete arrangement is planned before drilling.
Measure the wall, test the layout, select appropriate hardware, and relate the artwork to nearby furniture.
Use common height and spacing measurements as starting points rather than rigid rules.
The final display should look balanced from normal viewing positions while remaining safely attached and protected from damaging environmental conditions.